

Fine-tuning of YOLO v3 with small original datasets to detect custom objects
Fine-tune YOLO v3 with small original datasets to detect a custom object. In this post , detect WHILL Model C in image.
In this post, I will fine-tune YOLO v3 with small original datasets to detect a custom object.
The goal is to get the model to detect WHILL Model C in a image.
Fine-tuning is training certain output layers of pre-trained network with fixing parameters of input layers.
Using fine-tuning, the better performance can be put out even if you have small datasets.
The outline was as follows.
- Collect images using iCrawler
- Annotate with LabelImg
- Modify the configuration files of darknet YOLO according to the dataset
- Train with Google Colab (Fine-tuning)
In this post, 1. and 2. are omitted.
I prepared 80 images showing the whole WHILL Model C.
Because images and configuration files will be moved from GitHub to Google Colab, darknet YOLO is ma to your GitHub repository.
For example, here is my repository which was forked from darknet YOLO.
After cloning my repository which is forked from darknet YOLO, I put images and annotation data to /darkent/data/whill.
The images and annotation data was created in 2 above.
Modify configuration files in darknet YOLO
In this section, files in darkent/YOLO will be modified.
Prepare train.txt and test.txt
In darknet YOLO, we need files describing which image is used for training and for validating.
Default files names are train.txt and test.txt.
In order to generate these files, I wrote python script with reference to https://timebutt.github.io/static/how-to-train-yolov2-to-detect-custom-objects/ .
Here is the script https://github.com/KazumichiShirai/darknet/blob/master/python/divide.py .
When you use this script, path and file name (whill-train.txt, whill-test.txt) should be modified.
Execute the following command at top directory in your repository which was forked from darknet YOLO.
python divide.py
whill-train.txt will be generated as train datasets list.
whill-test.txt will be generated as validation datasets list.
Move these two files in /darknet/cfg.
Create cfg file
cfg file describes several settings like a number of batch and structure of neural net.
In this post, cfg file is created based on yolov3.cfg.
I create whill-frozen.cfg as training and whill.cfg as detecting WHILL model C in a image.
Create whill-frozen.cfg
Copy yolov3.cfg and create whill-frozen.cfg.
Then, whill-frozen.cfg is modified like below.
Modify batch and subdivisions.
batch=16
subdivisions=4
Change max_batches.
darknet YOLO repeats learning for max_batches times and so learning is not over if max_batches is too large.
The value of max_batches seems to be number of classes * 2000 [*] .
In this post, the value of max_batches will be 2000 because the object to detect is one (WHILL model C) .
I set the value of max_batches to 4000 to repeat learning more.
max_batches = 4000
Set steps to 80% and 90% of max_batches.
steps=3200,3600
Modify classes and filters.
The object to detect is one and so classes=1.
Calculate filters=(classes + 5)*number of mask.
In yolov3.cfg, number of mask is 3 because mask=6,7,8 is written.
So, set filters=18.
Both of classes and filters are written in three places.
Modify all three values in cfg file.
classes=1
filters=18
In this post, I use fine-tuning for training.
In darknet YOLO, you can set which layer is frozen using a parameter stopbackward=1.
Like this code, stopbackward=1 is added.
stopbackward=1
Create whill.cfg
The another cfg file is needed when YOLO detects objects with trained weight in a image.
Copy whill-frozen.cfg and create whill.cfg which will be used to detect a object in a image.
Then, whill.cfg is modified like below.
Remove comment out batch and subdivisions just after #Testing.
Add comment out batch and subdivisions just after #Training.
[net]
# Testing
batch=1
subdivisions=1
# Training
# batch=16
# subdivisions=4
Move these two cfg files (whill-frozen.cfg and whill.cfg) in darknet/cfg.
Create names file
Names of objects to be detected should be written in names file.
I wrote WHILLModelC in names file because the number of object is just one in this post.
Make whill.names and write WHILLModelC.
Then, move whill.names in darkent/data.
Create data file
Data file indicates number of classes and path of some setting files.
In this post, the object to be detected is one and so classes=1.
backup indicates the path where value of weights are saved during training.
classes= 1
train  = cfg/whill-train.txt
valid  = cfg/whill-test.txt
names = data/whill.names
backup = backup
Modify makefile to enable GPU
In order to enable GPU, makefile must be modified.
GPU=1
This is the last process in local environment.
Commit all modification to your repository.
Train in Google Colb
In this section, work on Google Colab.
The code which I used is whill_model_c_yolo.ipynb
Build and download weight
Clone and build darknet/YOLO in your repository.
In the example below, I cloned from my repository.
Modify https://github.com/KazumichiShirai/darknet to your repository.
%%bash
git clone https://github.com/KazumichiShirai/darknet
cd darknet
make
Download weight which was trained with ImageNet.
!wget https://pjreddie.com/media/files/darknet53.conv.74
In order to save files, Google Drive must be mounted.
from google.colab import drive
drive.mount('/content/gdrive')
Train with fine-tuning
Start training with fine-tuning with the command below.
In this command, output log is redirected to log file.
%%bash
cd ./darknet/
./darknet detector \
        train \
        cfg/whill.data \
        cfg/whill-frozen.cfg \
        /content/darknet53.conv.74 > /content/log
Wait for the training to finish.
It took about 4-5 hours to complete the training.
After the training finishes, you will find weights called whill-frozen_final.weights in the backup directory.
It is necessary to verify at what point the weight looks good and that the performance is likely to be sufficient while looking at the log file, but I will omit it here.
The weights in the backup directory will disappear when the Google Colab instance goes down, so save them to Google Drive immediately.
%cp /content/darknet/backup/whill-* /content/gdrive/My\ Drive/tmp/
Test with the weight which was trained with original datasets
Test to detect WHILL Model C in a image which is not used for training.
I upload sample.jpg to Google Drive and test to detect WHILL Model C in sample.jpg with the command below.
%%bash
cd ./darknet
./darknet detector test cfg/whill.data cfg/whill.cfg /content/gdrive/My\ Drive/tmp/whill-frozen_final.weights /content/gdrive/My\ Drive/tmp/sample.JPG
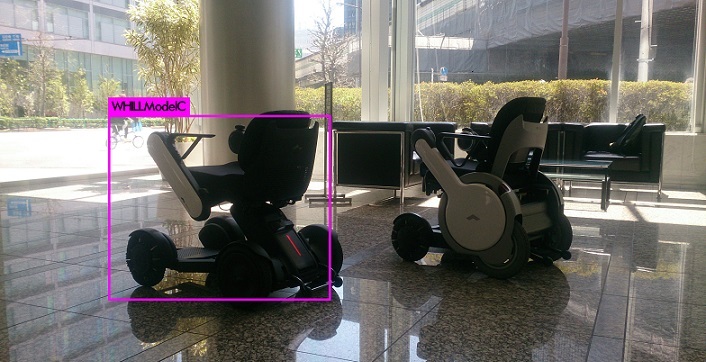
predictions.jpg is created as a result.
Show predictions.jpg with the command below.
from IPython.display import Image,display_jpeg
display_jpeg(Image('darknet/predictions.jpg'))
WHILL Model C can be detected!
Reference site
Yolo-v3 and Yolo-v2 for Windows and Linux How to train YOLOv2 to detect custom objects

Share this post
Twitter
Facebook
LinkedIn